Alert about failures
Keep yourself and your stakeholders informed about Expectation failures by configuring alerts in GX Cloud. When a Validation run fails, GX Cloud will send notifications according to your alert settings. Notifications provide high-level information about how many Expectations failed and include a link to detailed Validation Results, where you can investigate the failures to determine next steps and optionally create an incident to track resolving the issue that led to the failure.
Alerts are configured at the Data Asset level. A single Data Asset can have multiple alerts configured. An alert can be configured to notify about all Expectation failures or only failures of certain severities.
Alerts can send notifications to the following recipients:
- Email addresses.
- Microsoft Teams standard channels in public teams, optionally @mentioning users or custom tags.
- Slack public channels, optionally @mentioning users or user groups.
Note that to enable @mentions for Microsoft Teams or Slack, your GX Cloud workspace must be integrated with Microsoft Teams or integrated with Slack.
Integrations for PagerDuty and ServiceNow are coming soon. In the meantime, you can use email alerts as described below. Contact us to learn more or to request a different integration.
To keep your email alerts secure, your GX Cloud organization has an allowlist of email domains that all alert recipient email addresses must belong to. By default, this includes the email domain of the Organization Owner who created the organization and domains for sending email notifications to the following third-party services: PagerDuty and ServiceNow.
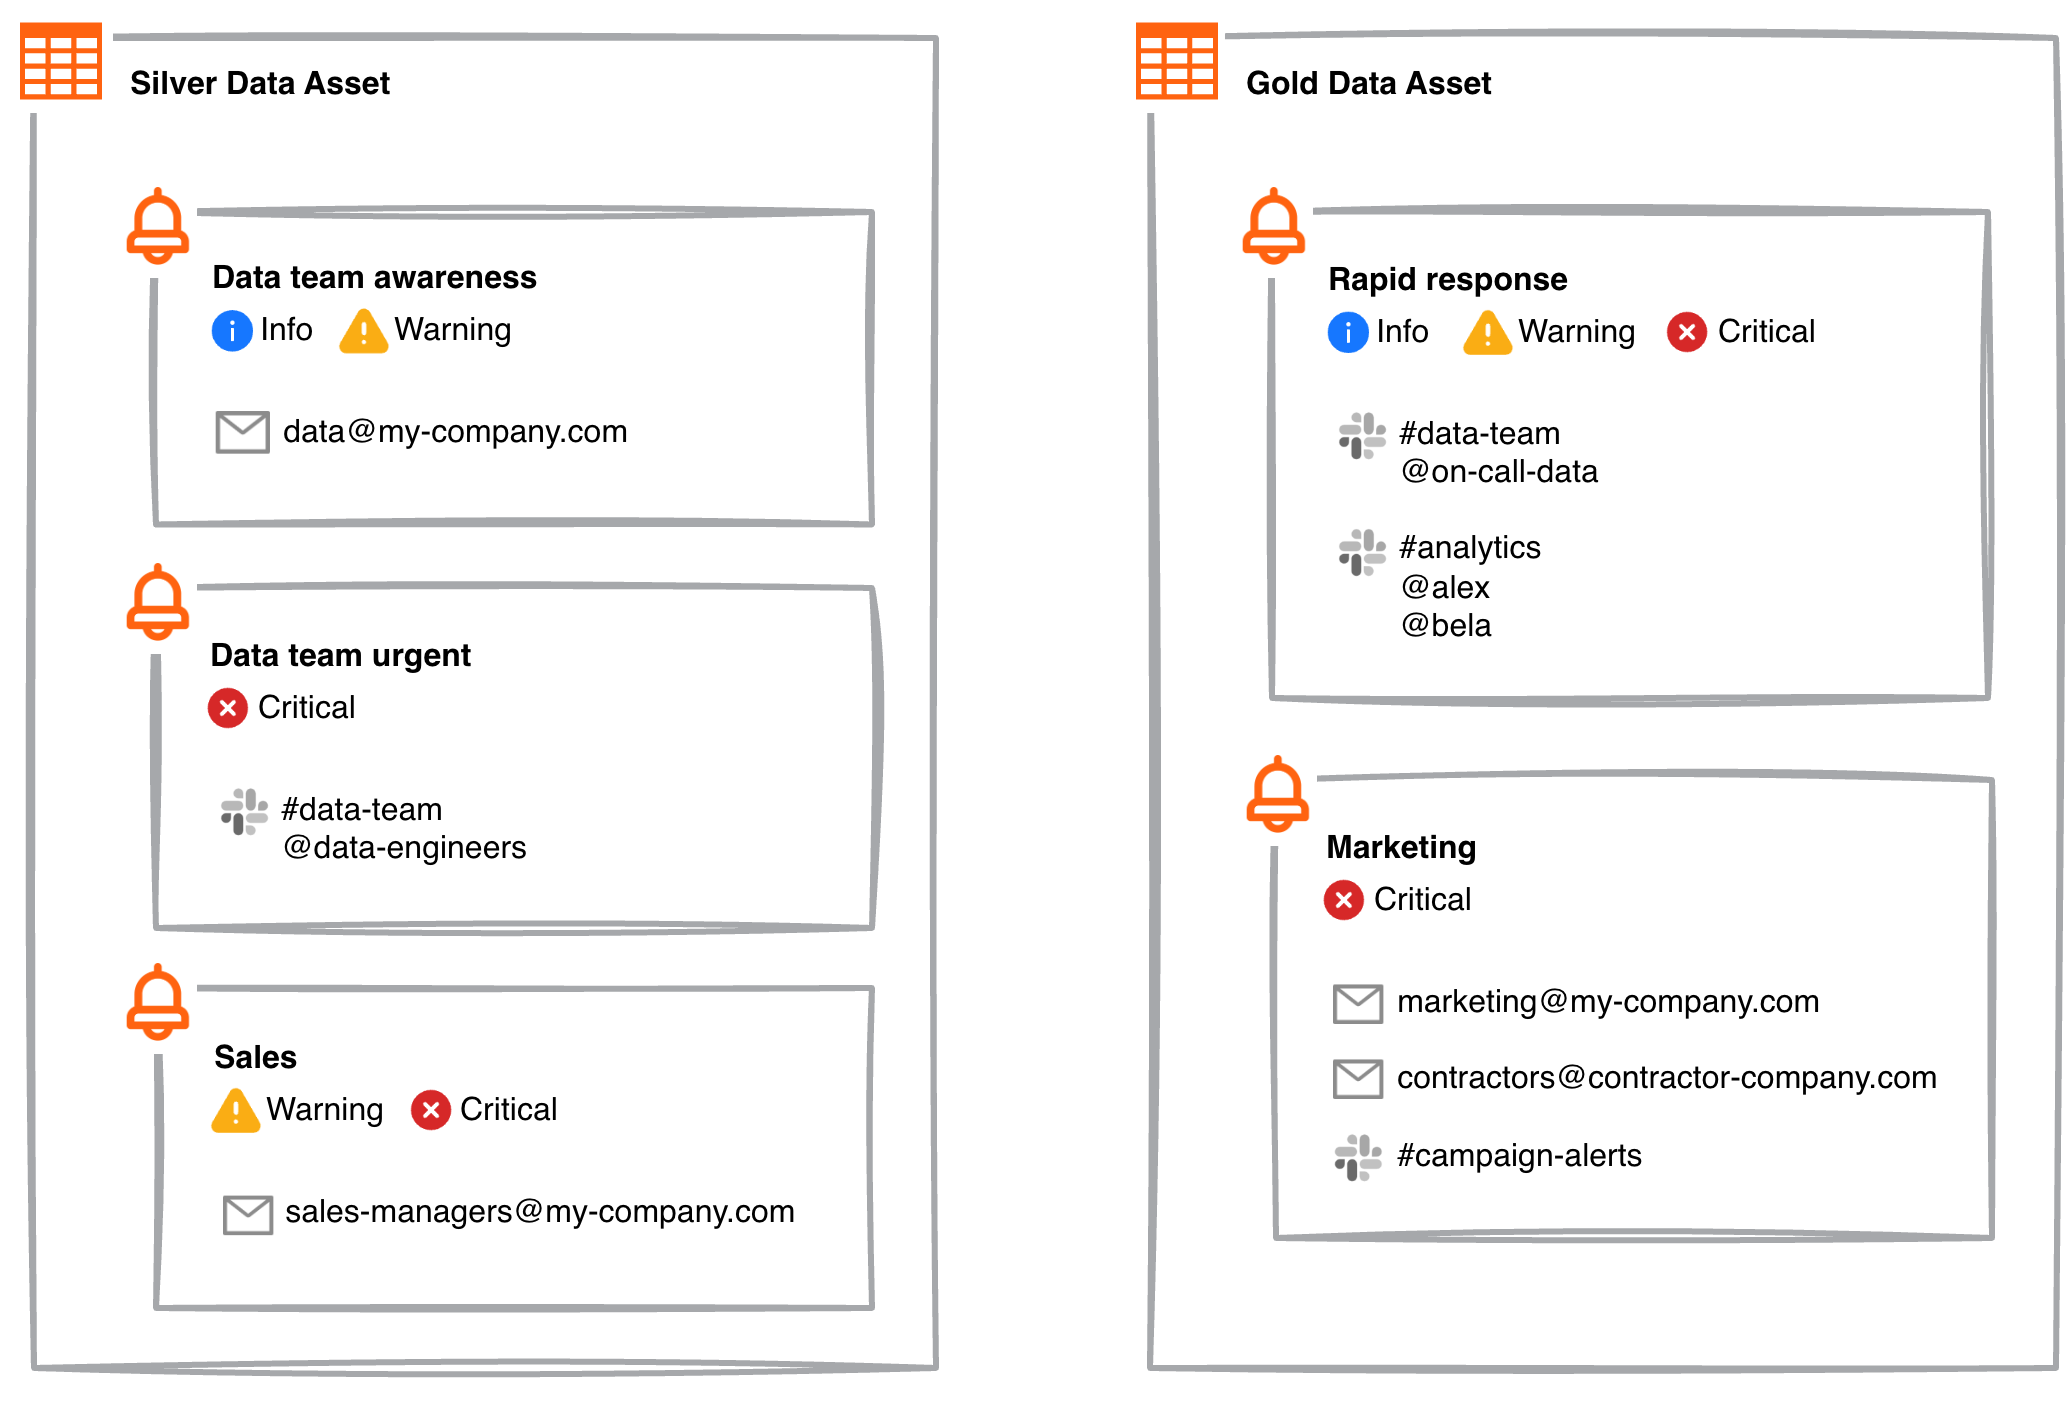
Here is an example of how a team might configure alerts on their Data Assets to make sure the right people get the right information at the right time.
Note that you must have Workspace Editor permissions or greater to manage alerts.
Create an alert
- In the GX Cloud UI, select the relevant Workspace and then click Data Assets.
- In the Data Assets list, click the Data Asset name.
- Click Settings.
- In the Alerts section, click + ADD.
- In the Alert name field, enter a name for the alert that will help you quickly identify it later.
- Under Severity, select one or more failure severities for the alert to notify about.
- To alert an email address, do the following. Under Recipients, next to Emails, click + and enter an email address for the alert to send notifications to. Note that the domain of the email address must belong to your organization’s email domain allowlist. By default, the following third-party domains are allowed for email notifications to third-party services.
- PagerDuty -
*.pagerduty.com - ServiceNow -
*.service-now.com
- PagerDuty -
- To alert a Slack channel, do the following. First, make sure your GX Cloud workspace is integrated with Slack. Then, under Recipients, next to Slack channels, click + and select a channel for the alert to send notifications to. After selecting the channel, you will have the option to specify @mentions to include in the notification message. You can mention any user or user group in your Slack workspace.
- To alert a Microsoft Teams channel, do the following. First, make sure your GX Cloud workspace is integrated with Microsoft Teams. Then, under Recipients, next to Microsoft Teams channels, click + and select a team and channel for the alert to send notifications to. After selecting a channel, you will have the option to specify @mentions to include in the notification message. You can mention any user in the channel or any custom tag configured for the team.
- Optional. To send the same notification to another recipient, click + and enter another email address, Slack channel, or Teams channel. Repeat as needed.
- Click Save.
Edit an alert
- In the GX Cloud UI, select the relevant Workspace and then click Data Assets.
- In the Data Assets list, click the Data Asset name.
- Click Settings.
- In the Alerts section, find the alert that you want to edit.
- Click
 Edit alert for the alert that you want to edit.
 - Edit the alert configuration.
- Click Save.
Disable or enable an alert
If you want to temporarily stop an alert from sending notifications, you can disable it instead of deleting it. This makes it easier to restore the alert when you’re ready for it to start sending notifications again.
- In the GX Cloud UI, select the relevant Workspace and then click Data Assets.
- In the Data Assets list, click the Data Asset name.
- Click Settings.
- In the Alerts section, find the alert that you want to disable or enable.
- Click the ON / OFF toggle switch to disable or enable the alert.
Delete an alert
- In the GX Cloud UI, select the relevant Workspace and then click Data Assets.
- In the Data Assets list, click the Data Asset name.
- Click Settings.
- In the Alerts section, find the alert that you want to delete.
- Click
 Delete alert for the alert that you want to delete.
 - Click Delete.
Update your organization’s email domain allowlist
By default, your organization’s email domain allowlist includes the following:
- The email domain of the Organization Owner who created the organization
*.pagerduty.com*.service-now.com
If your organization has SSO configured, all of your SSO domains will also be included in your email domain allowlist.
To request changes to your organization’s email domain allowlist, have an Organization Owner contact support.