Use GX with dbt
Overview
This tutorial will enable you to schedule and run data pipelines locally using PostgreSQL as the database, dbt for transforming data, Great Expectations for data quality and Airflow for workflow orchestration - all running inside of containers via Docker Compose. This tutorial assumes you have basic knowledge of Python, SQL, Docker, and how to use a CLI. The tutorial will have step-by-step instructions along with explanations for those who want a deeper understanding of what you are doing and why.
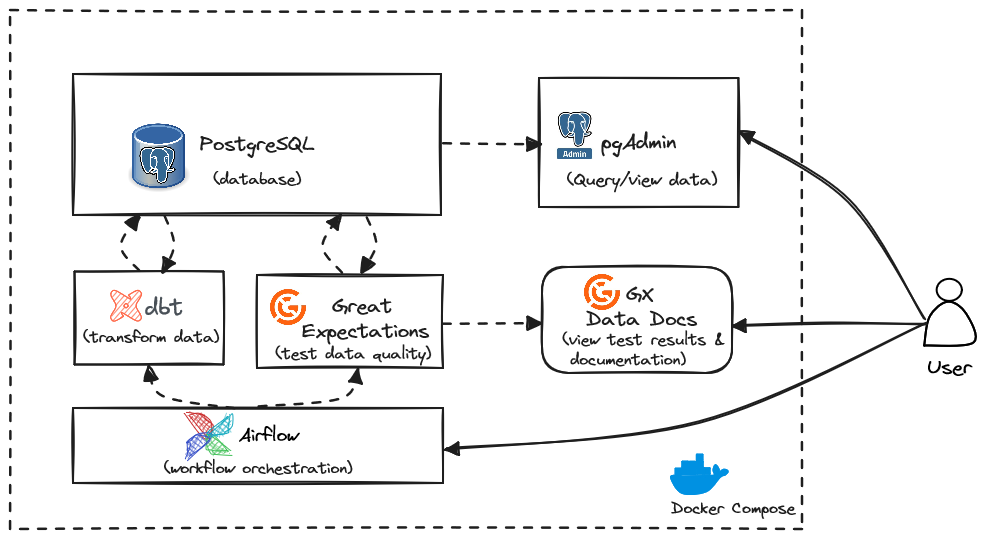
Before you get started, take a look at a high-level overview of how these tools will work together. First, notice that you will be using Docker Compose, which allows you to run each of the tools/services below in separate Docker containers that can depend on and interact with each other. Containerizing your services is a best practice as it allows you to customize the environment for each service and replicate it on any other machine.
As mentioned above, you will have PostgreSQL to store the data, dbt to transform it, Great Expectations to run data quality tests, and Airflow to orchestrate that whole process. All of these tools are popular open-source tools that you are likely to find in the real world, but you are encouraged to focus on the concepts rather than the specifics of these tools.
Finally, to interact with our data, you will be using pgAdmin to query/view it (though you can use another database query tool if you want), the Great Expectations data docs to see our data quality results, Airflow to run our pipeline, and a CLI to interact with some of the services.
Prerequisites
In addition to the prerequisites below, you are recommneded to use an IDE like VSCode to organize your project.
- Basic knowledge of Python, SQL, Docker.
- Familiarity with using CLIs.
- Docker Desktop
- ssh-keygen
- Bash shell or Z shell (Zsh)
1. Clone the GitHub repo
Open a terminal window and navigate to the folder you want to use for this tutorial. Next, clone the example GitHub repo for this project by running the code below in your terminal.
git clone https://github.com/greatexpectationslabs/dbt-tutorial.git
cd dbt-tutorial/tutorial-dbt-gx-airflow
mkdir data
mkdir great-expectations
mkdir ssh-keys
After completing the steps above, your folder structure should look like this:
dbt-tutorial
└── tutorial-dbt-gx-airflow/
    ├── airflow/
        └── .env
    ├── data/
    ├── great-expectations/
    ├── pgadmin-data/
    ├── ssh-keys/
    ├── airflow.Dockerfile
The project contains the following files:
Airflow configuration file (airflow/.env)
- The first 3 variables under
# Meta-Databaseset the PostgreSQL credentials for Airflow's metadata storage. Note that this database is strictly for Airflow to store its metadata and it’s not the same PostgreSQL database that you will be using for storing the actual data. You should change any default usernames and passwords like this for a production environment. AIRFLOW__CORE__EXECUTOR: Because you will be running this locally, this is set up to use theLocalExecutor, but in production you would typically use a remote executor like the Celery Executor or the Kubernetes Executor.AIRFLOW__DATABASE__SQL_ALCHEMY_CONN: This is a connection string to the Airflow metadata database mentioned above. Similar to the first bullet, the last 2 variables set the credentials you’ll need to login to the airflow webserver.
Airflow Dockerfile
- Here you will use the official airflow image as a base image.
dbt Project Template
- The jaffle shop template project has been included from GitHub that has all of the configuration files you will need to get started, but some of the settings have been tweaked from the example project.
- The
.envfile has been added to store the credentials needed to connect to PostgreSQL. - The dbt project has been configured to use a default profile containing the credentials needed to connect to our PostgreSQL database. The dbt Jinja syntax is used here to pass in sensitive credentials from the .env file.
dbt Dockerfile
- The dbt.Dockerfile contains code that copies the dbt folder into a Docker container and installs all necessary dbt dependencies, including dbt-postgres. This package is necessary to use dbt with a PostgreSQL database.
- Line 11 exports the credentials from the credentials file when connecting to the Docker container.
- ssh is installed, which will allow you to run an ssh server inside this container so that you can connect to this container via ssh from other containers. Port 22 is exposed because that is the default port that SSH expects to use. Finally, a command is run to tell ssh that our ssh key is authorized so you don’t have to deal with any verification prompts when interacting programmatically.
Great Expectations Dockerfile
- Docker is instructed to install a few libraries you will need for GX and for it to interact with PostgreSQL.
Docker Compose File
This tutorial does not include a full explanation of the Docker Compose file. However, please make note of the following:
- Airflow is a collection of 4 different services: an initialization service (this happens when you first run the service), a web server, a scheduler, and a PostgreSQL backend that stores metadata about this pipeline.
- For each service, the Docker image is defined to use, environment variables to pass into the container, and which services are dependent on each other. For example, the airflow-postgres service needs to be running before the webserver and scheduler services can start.
- Line 159 defines a default network for all services in this pipeline. This section also defines the services' names as the host name in credentials, instead of using an IP address.
- Line 165 demonstrates how to securely pass ssh keys using Docker secrets to the containers in the pipeline. This pattern is recommended as a best practice.
2. Generate SSH Keys
You will need to generate a key pair that you will use in our Docker services to securely authenticate with each other. You can read more about how SSH keys work here.
Run the following command in a terminal window inside of the tutorial-dbt-gx-airflow directory:
ssh-keygen -t rsa -b 4096 -f ./ssh-keys/id_rsa -N ""
Double check that at this point, your project structure looks like this:
dbt-tutorial/
└── tutorial-dbt-gx-airflow/
    ├── airflow/
        └── .env
    ├── data/
    ├── dbt/
        └── …
    ├── great expectations/
    ├── pgadmin-data/
    ├── ssh-keys/
        └── …
    ├── airflow.Dockerfile
    ├── dbt.Dockerfile
    ├── docker-compose.yaml
    └── gx.Dockerfile
3. Start the Docker Services
Ensure Docker desktop is open and running. Next, you will initialize and connect each of the services in this example using the commands below.
Using a command prompt in your tutorial-dbt-gx-airflow directory, run the following to start all of the services:
docker compose up -d --build
When you run this for the first time, it may take several minutes to download and install the required libraries.
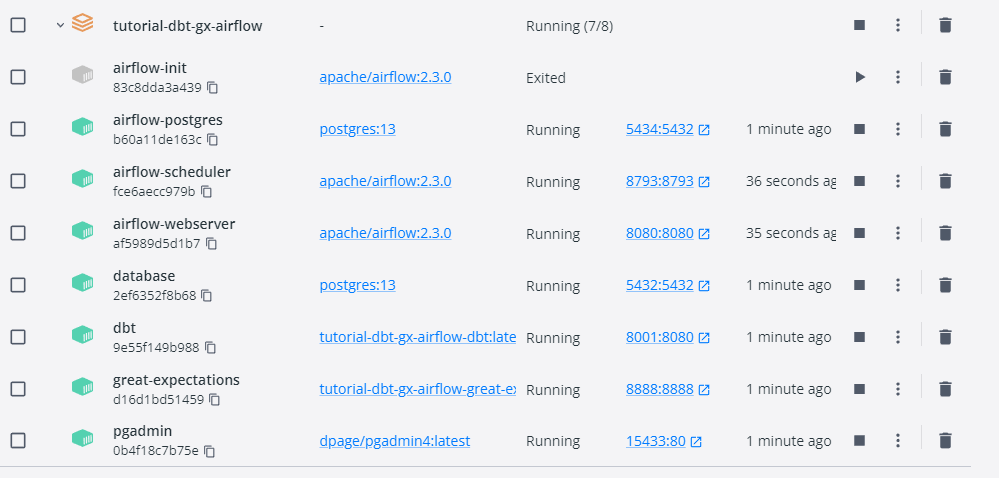
You will also notice that one of the services airflow-init exits after running, but that is expected because it’s only used to initialize the airflow service.
Once everything is complete, your Docker Desktop Containers screen will look like this:
4. Connect to the Database
This tutorial uses pgAdmin to interact with the PostgreSQL database, but you can use the SQL editor of your choice.
Log into pgAdmin
Open pgAdmin by either clicking on the port for the pgAdmin service in Docker Desktop or by going to http://localhost:15433 in your browser.

Log in using the credentials specified in Docker Compose for pgAdmin:
- Username: example@email.com
- Password: postgres
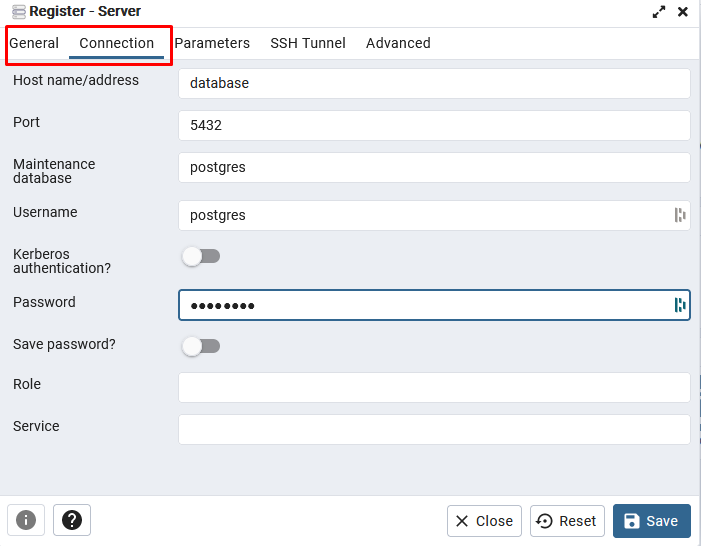
Create a connection to PostgreSQL
- Right click on Servers in the top left corner and choose Register > Server
- Name it postgres
- Click on the Connection tab
- Host name/address: database (refers to the database docker service)
- Username and password: postgres (defined in Docker Compose under database service)
- Save the connection
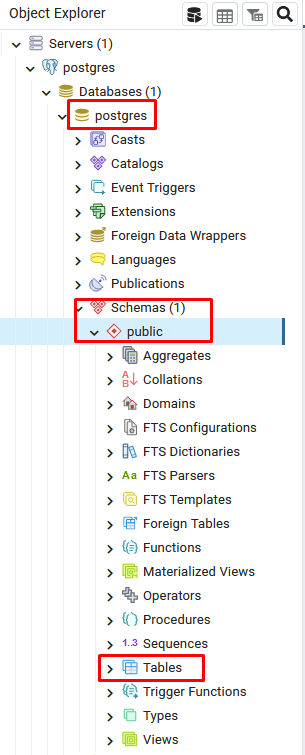
You will now be able to see your empty database when you look under the public schema > tables:
5. Populate the Database
The dbt project that is included from GitHub has some initial datasets in the form of seed files. You will import these seed files into the database as tables and then use these tables as the data source for the rest of our dbt models.
Open the dbt Docker container’s terminal via running the following command in your project’s terminal:
docker exec -it dbt bash -l
Here you are using the docker exec command to open an interactive terminal inside the container using bash as the shell. The -l flag is important here because it tells the shell to be a login shell, which automatically sources the .bashrc file in the container, which in turn exports the dbt environment variables. See the dbt.Dockerfile for more info.
Next, run the dbt deps command to install dependencies. Then, copy the seed data into the seeds folder by running cp jaffle-data/*.csv and run the dbt seed command to import the data into the PostgreSQL database. By default, it will import the data into a new schema called jaffle_shop_raw. This step might take a few minutes to complete.
dbt deps
cp jaffle-data/*.csv seeds
dbt seed
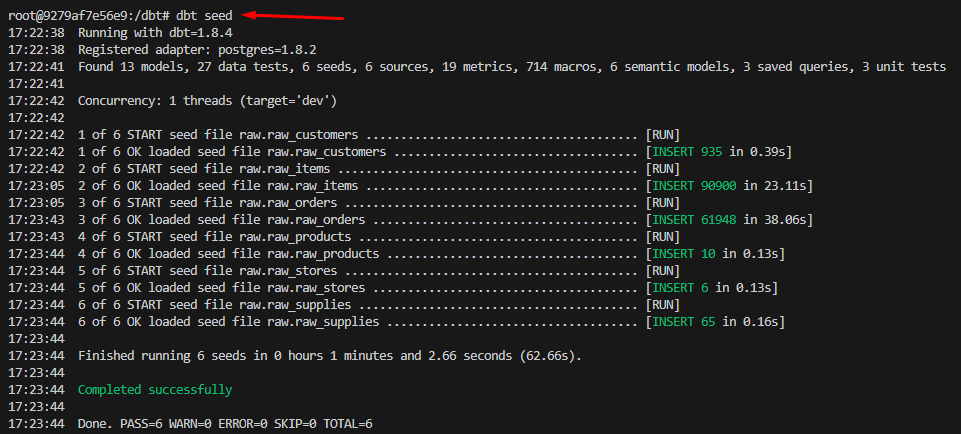
In pgAdmin you can now see the newly created tables in the new schema.

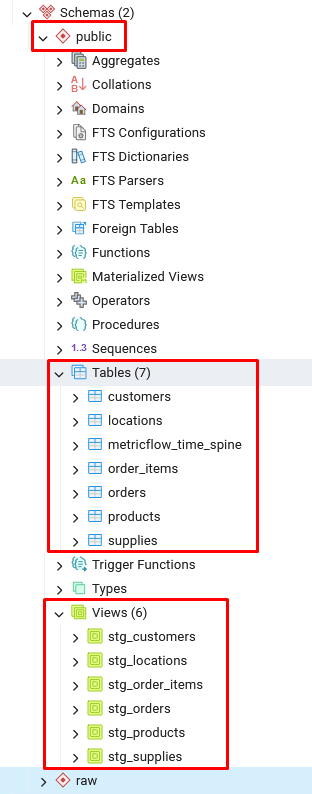
Run the rest of the dbt models by running the command below in the dbt service command line:
dbt run
You will see the models have been created successfully as tables and views within the public schema:
To exit the dbt Docker container's terminal, run the following command:
exit
6. Use Great Expectations to create data quality tests
In the next section of this tutorial, you will follow the Getting Started guide to run GX with SQL within a Docker container. This guide describes the process using Jupyter Notebook, although you can use any Python development tool you prefer.
Initialize the Jupyter Notebook Server
Run the following command within the project directory to start the Jupyter Notebook server:
docker exec great-expectations jupyter notebook --allow-root --no-browser --ip=0.0.0.0
Once it’s up and running you will see a similar message to the one below and be able to copy or click on the url starting with 127.0.0.1. The token at the end of the URL is unique and required to access the Jupyter Notebook server:

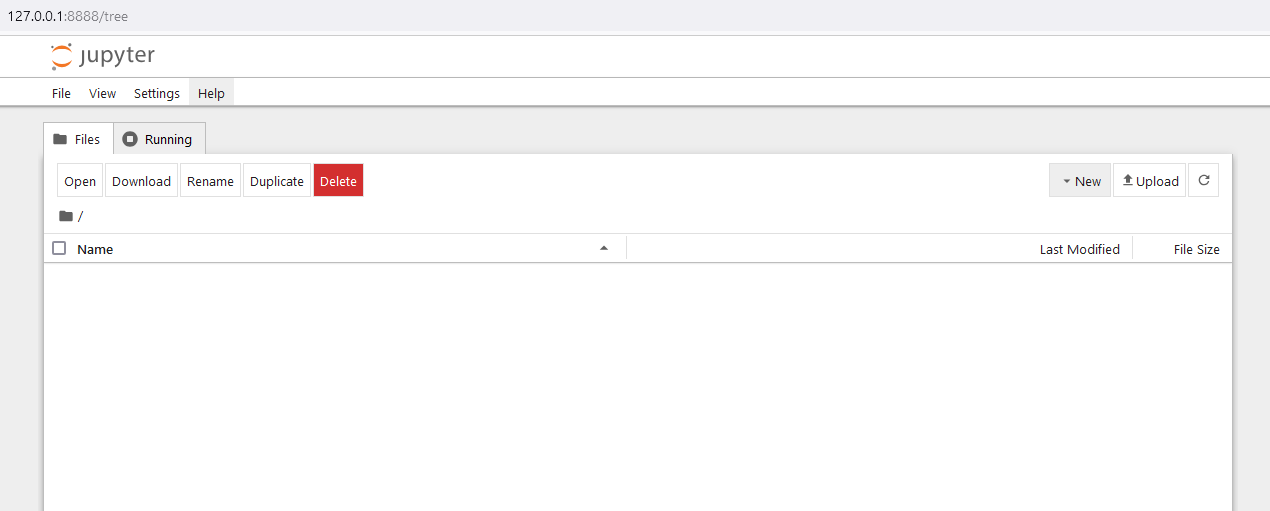
Create a new notebook. In the top left corner choose File > New > Notebook. Then select the Python 3 Kernel if prompted.
Create the GX Configuration
This section of the tutorial will demonstrate how to configure GX and create an Expectation. First you will create a Data Context to store your GX configuration and create a new Data Source (connecting to PostgreSQL). Next, you will create a Data Asset, defining a table to test with: the customers table in PostgreSQL. Then, you will create the Expectations ExpectColumnValuesToNotBeNull and ExpectColumnValuesToBeBetween. Finally, you will run Validations against the data. Copy the code into a new notebook, running each snippet in a separate cell.
Start by naming the Notebook customer_expectations.ipynb, or a name of your choosing. The following lines of code import the modules you will need to use GX and create a Data Context. This example stores the GX configuration to the file system.
import great_expectations as gx
import great_expectations.expectations as gxe
from great_expectations.checkpoint import UpdateDataDocsAction

context = gx.get_context(mode="file")
You can either press the b button on your keyboard or press the “Insert a cell below” button in any cell to create a new cell.
A Data Source is the GX representation of a data store. In this tutorial, you are using a PostgreSQL data source, but you can adapt the examples to any other supported Data Source. A Data Asset is the GX representation of a collection of records within a Data Source which are usually grouped based on the underlying data system. In this tutorial, you create a Batch Definition for the whole customers table, but you can also create batches based on a date column within the table.
## Connect to your data

PG_CONNECTION_STRING = "postgresql+psycopg2://postgres:postgres@database/postgres"
pg_datasource = context.data_sources.add_postgres(name="pg_datasource", connection_string=PG_CONNECTION_STRING)
asset = pg_datasource.add_table_asset(name="customer_data", table_name="customers")
bd = asset.add_batch_definition_whole_table("BD")
An Expectation Suite is a group of Expectations that describe how data should be tested. A Validation Definition links an Expectation Suite to the data it describes via the Batch Definition you created in the previous step. You can then add Expectations to the Expectation Suite. In this example, you create an Expectation to check that the customer_id column values are never null. Separately, you create another Expectation to check that the values of the lifetime_spend column are between 0 and 100000. Browse the Expectations Gallery to explore all available Expectations you can use to gain insight into your data.
## Create Expectations
suite = context.suites.add(gx.ExpectationSuite("Suite"))
vd = gx.ValidationDefinition(
    name="Validation Definition",
    data=bd,
    suite=suite
)

context.validation_definitions.add(vd)
suite.add_expectation(gxe.ExpectColumnValuesToNotBeNull(column="customer_id"))
suite.add_expectation(gxe.ExpectColumnValuesToBeBetween(column="lifetime_spend", min_value=0, max_value=100000))
A Checkpoint is an object that groups Validation Definitions and runs them with shared parameters and automated Actions. Checkpoints are the primary means for validating data in a production deployment of Great Expectations. In this tutorial, you update the Data Docs, which is a static website generated from Great Expectations metadata detailing Expectations, Validation Results, etc.
## Validate your data
checkpoint = context.checkpoints.add(gx.Checkpoint(
    name="Checkpoint",
    validation_definitions=[vd],
    actions=[
        UpdateDataDocsAction(name="update_data_docs")
    ]
))

checkpoint_result = checkpoint.run()
View the Expectation results in Data Docs
View the Validation results by navigating to the URL here:http://127.0.0.1:8888/edit/gx/uncommitted/data_docs/local_site/index.html
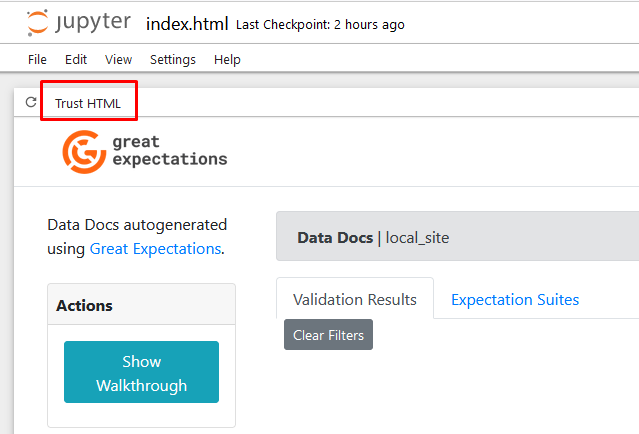
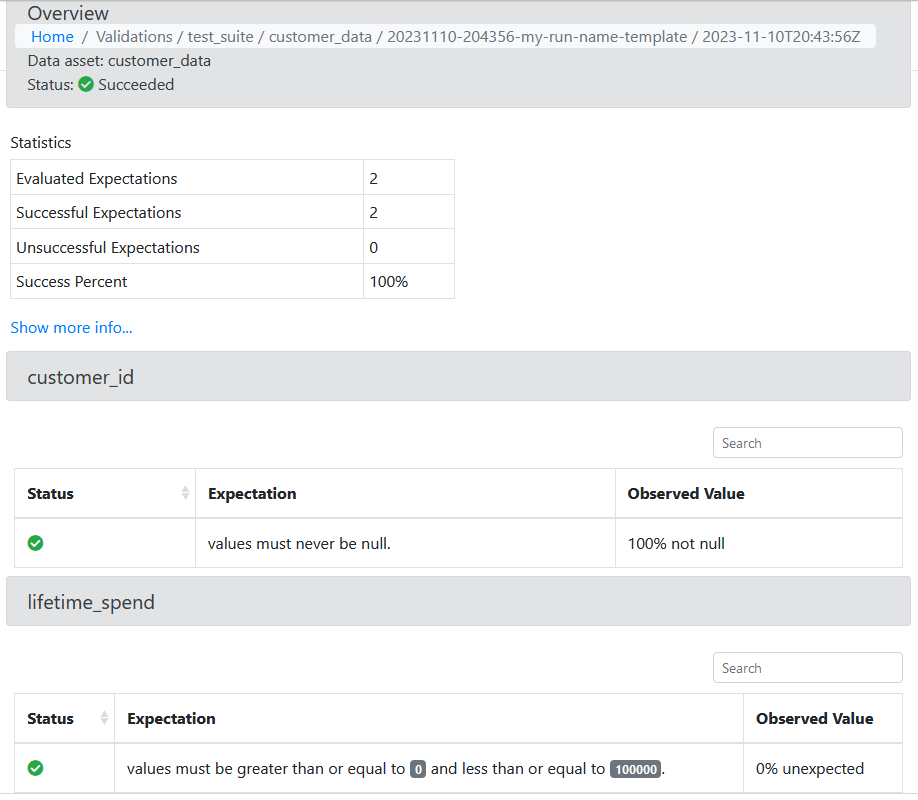
You can see that the two Expectations you have created are passing. View failed Expectations in the status column. The Observed Value column displays any values that have fallen outside of the expected range.
7. Build a data pipeline and automate it with Airflow
The final portion of this tutorial automates the process above with a pipeline or DAG in the workflow orchestration tool Airflow. You will create a simple pipeline using the common write-audit-publish pattern.
For a more ergonomic interface and more flexibility, use the Great Expectations Airflow Provider to validate data directly from a DAG.
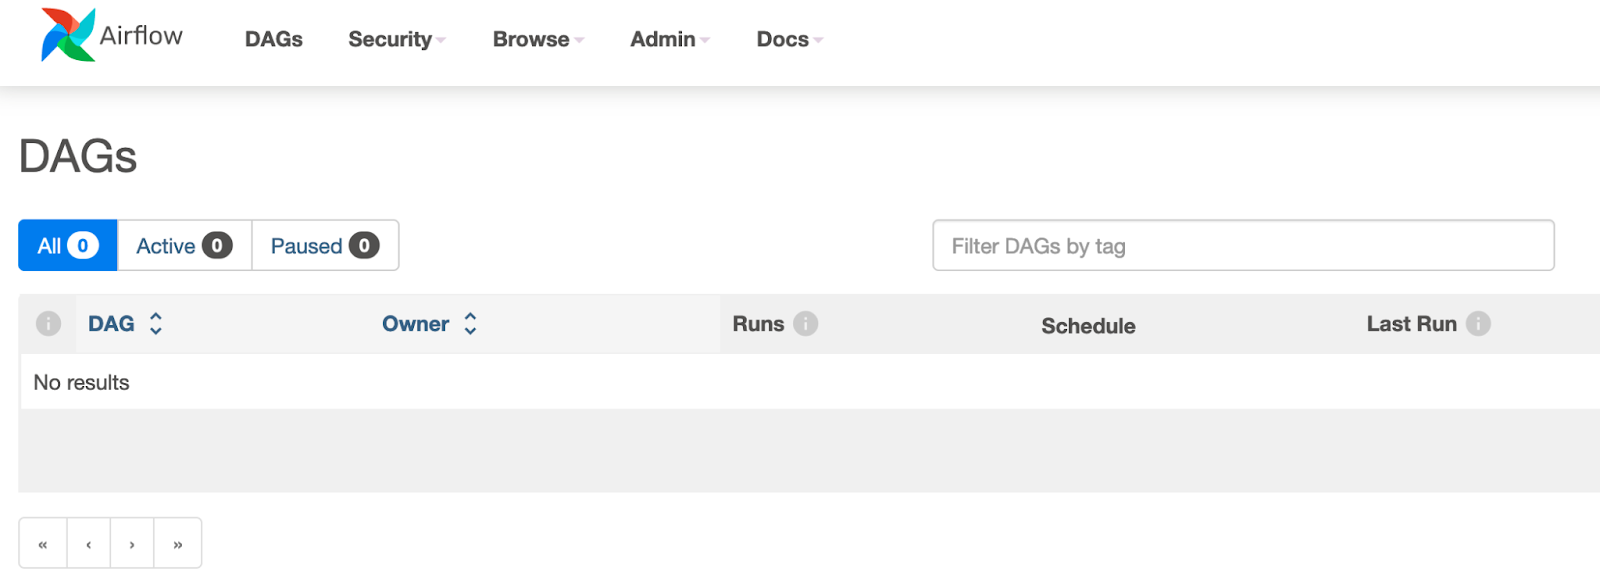
Log into Airflow
Open http://localhost:8080 in your browser. You can use the username and password created earlier in the configuration step. username=airflow password=airflow
And you will see an empty DAGs dashboard:
Create a DAG and add a connection
Create a new Airflow DAG using the command in the root of your project directory:
touch airflow/dags/customers_dag.py
Copy the contents below into your new DAG file:
from datetime import datetime
from airflow import DAG
from airflow.providers.ssh.operators.ssh import SSHOperator
from airflow.providers.ssh.hooks.ssh import SSHHook
from airflow.operators.python import PythonOperator
import great_expectations as gx

sshHook = SSHHook(ssh_conn_id="dbt-ssh", cmd_timeout=None)

def run_gx_checkpoint():
   context = gx.get_context(mode="file", project_root_dir="../../great-expectations/")
   context.checkpoints.get("Checkpoint").run()

with DAG(
   dag_id='customers_dag',
   start_date=datetime(2023, 11, 10),
   schedule_interval=None
) as dag:

   write_data = SSHOperator(
       task_id='write_data',
       command="dbt seed",
       ssh_hook=sshHook,
   )

   gx_run_audit = PythonOperator(
       task_id="gx_run_audit",
       python_callable=run_gx_checkpoint
   )

   dbt_publish_model = SSHOperator(
       task_id='dbt_publish_model',
       command="dbt run",
       ssh_hook=sshHook,
   )

write_data >> gx_run_audit >> dbt_publish_model
This DAG file contains the process above, however executing the GX Checkpoint is as simple as loading the previously created Data Context and running the stored Checkpoint.
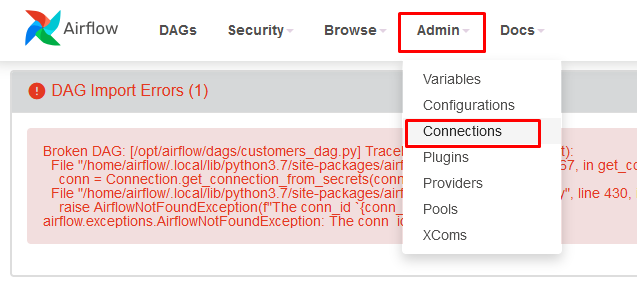
After a few minutes, the new pipleline will appear in Airflow. Next, you will receive the following error:
Broken DAG: [/opt/airflow/dags/customers_dag.py] Traceback (most recent call last):
  File "home/airflow/.local/lib/python3.11/site-packages/airflow/hooks/base.py", line 67, in get_connection
    conn = Connection.get_connection_from_secrets(conn_id)
  File "/home/airflow/.local/lib/python3.11/site-packages/airflow/models/connection.py", line 430, in get_connect_from_secrets
    raise AirflowNotFoundException(f"The conn_id `{conn_id}` isn't defined")
airflow.exceptions.AirflowNotFoundException: The conn  id `dbt-ssd` isn't defined
The next steps are to create a new dbt connection and add credentials for the PostgreSQL database.
Add dbt-ssh credentials:
- In Airflow click on Admin > Connections
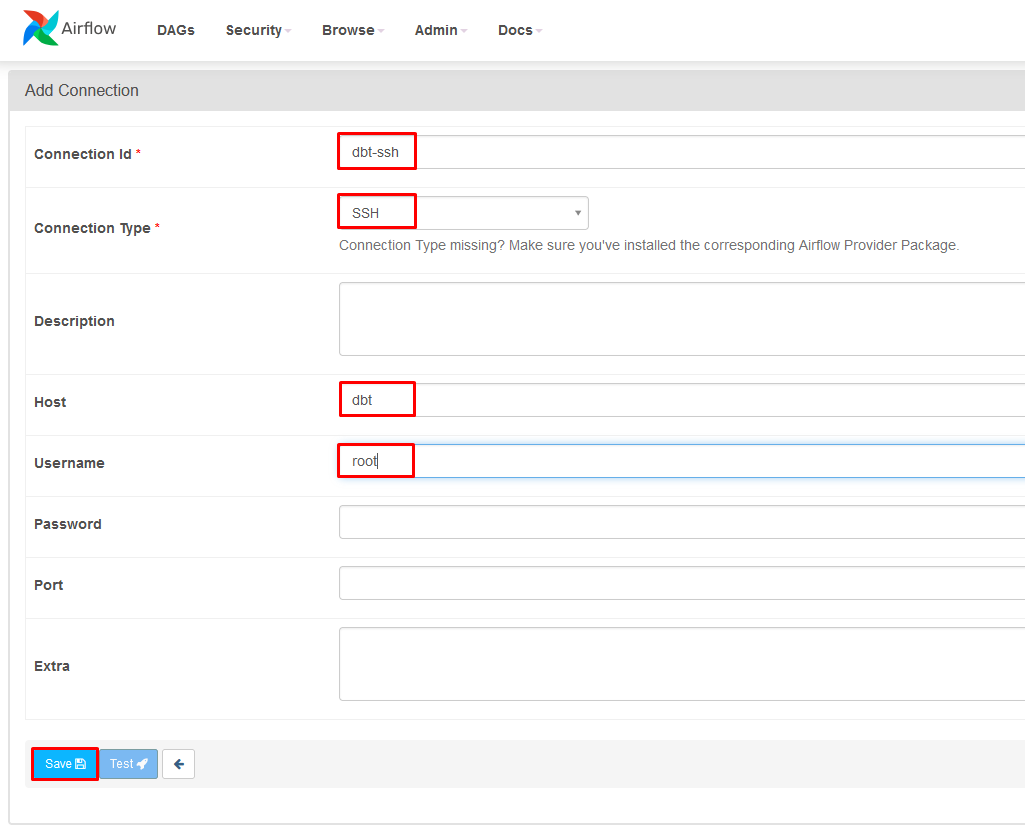
- Click on the + to add a new record
- Fill out the connection using the following:
- Connection id: dbt-ssh
- Connection Type: SSH
- Host: dbt
- Username: root
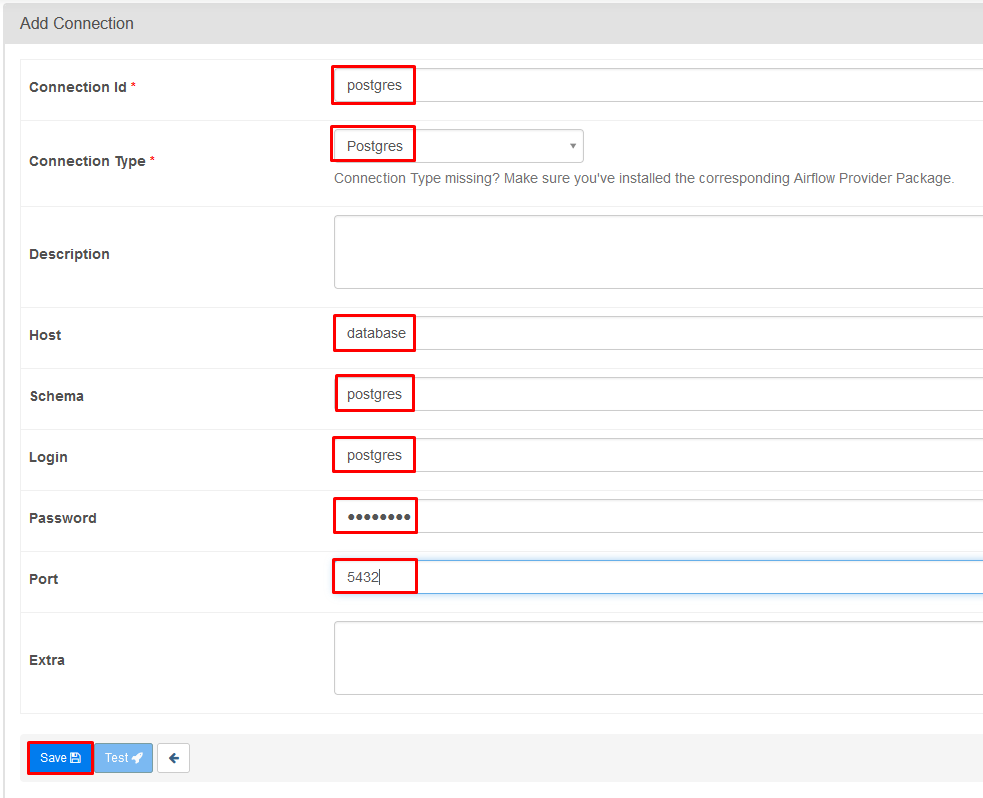
Add Postgres credentials:
- Still inside Admin > Connections click + to add a new record
- Fill out the connection using the following:
- Connection id: postgres
- Connection Type: Postgres
- Host: database
- Database: postgres
- Login: postgres
- Password: postgres
- Port: 5432
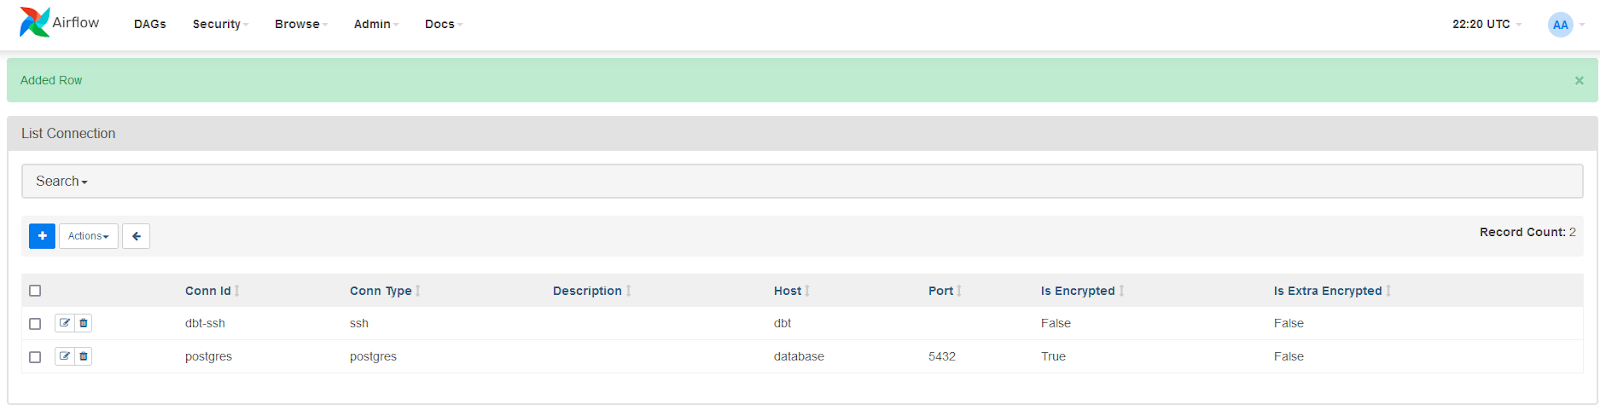
Your connections page will now look like this:
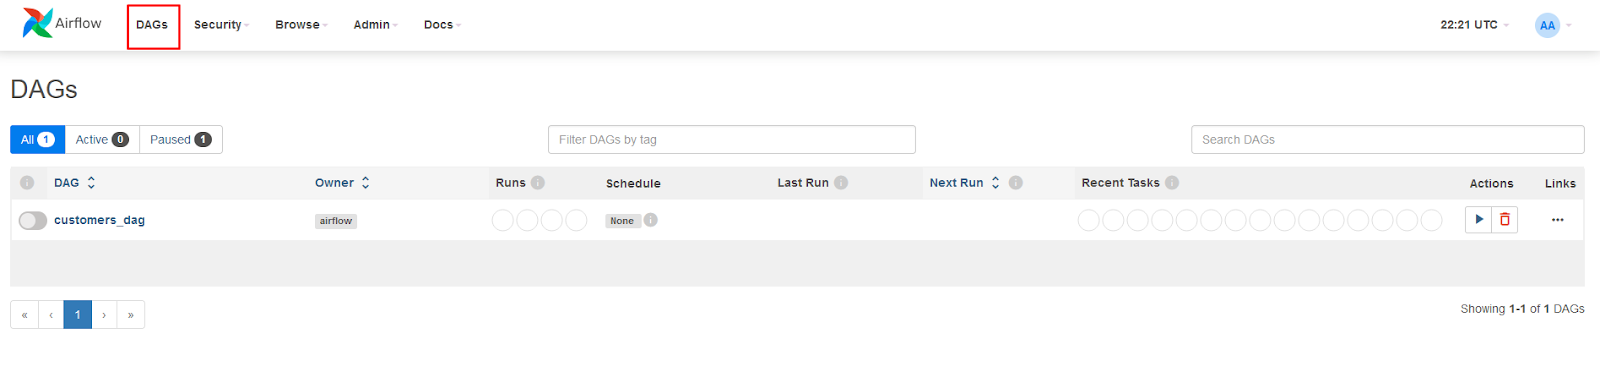
You will now see customers_dag listed on the DAGs page:
Run the DAG
Run the DAG by navigating to Actions and clicking the play button. Then choose Trigger DAG.

If you see an error saying “Task exited with return code Negsignal.SIGKILL” then it usually means that Airflow doesn’t have enough resources to run. Airflow recommends 4GB memory. Make sure your Docker resources are set appropriately (Docker Desktop > settings > Resources.)
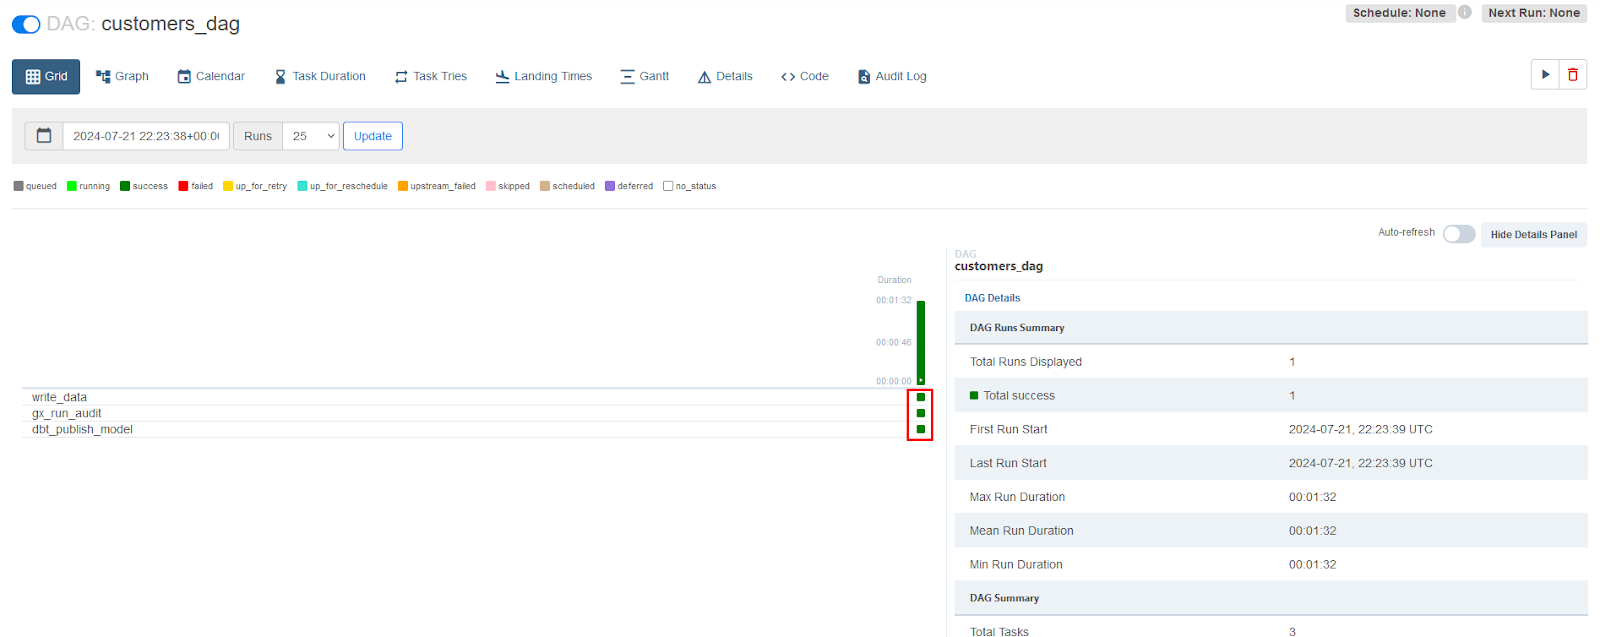
You can click on the DAG name to watch it as it runs and wait for it to complete:
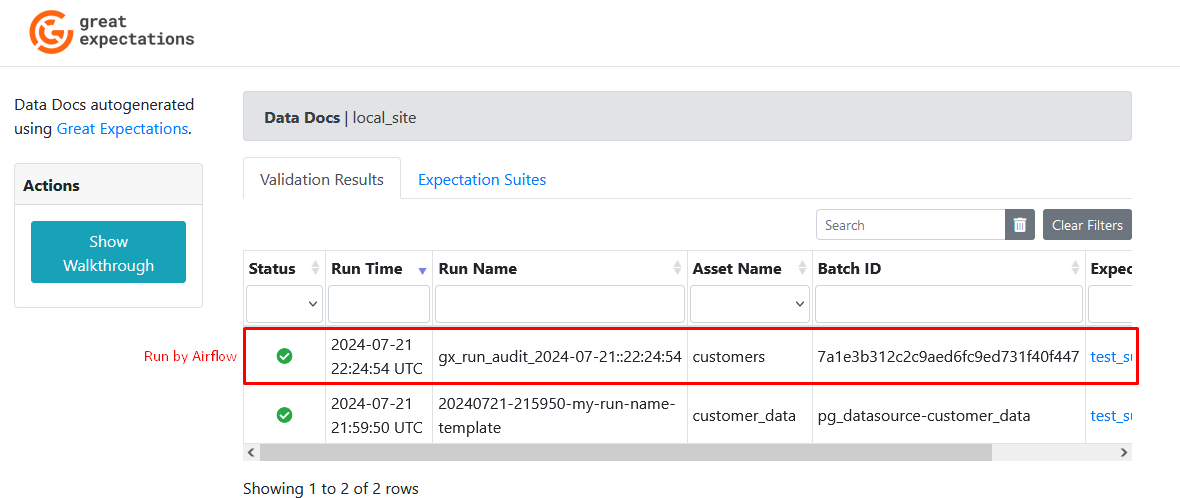
Refresh the Data Docs page to see new results from the DAG run:
Conclusion
You have learned to build a pipeline using PostgreSQL, dbt, GX and Airflow. This tutorial covers a basic implementation for scheduling and running a data pipeline with open source tools. You can explore other possibilities with GX by connecting to your own Data Sources or exploring the other use cases in this section. See the Expectations Gallery to learn about all the Expectations you can run on your data.